Have you experienced error that come out when you run Temaviewer on your system. No need to bother since here you will get detailed information to fix the error and to run this software as smoothly as you want.
Initially, it is required to uninstall the Teamviewer and to delete it from the system.
Steps:
1. Uninstall the Teamviewer from your computer. This can be done by Add/Remove Program which will see at:-
Start – > Control Panel -> Program
2. Then Click on Uninstall a program.
3. Then Go to the Teamviewer in the all programs and uninstall it.
4. After un-installation process Go to Start Menu And then Run.
5. In the Run Program window Type %appdata% and Delete the Teamviewer Folder from it.![]()
6. After doing this, it is time to Delete Registry Folder of Teamviewer By getting into Registry Editor. You can open Registry Editor by Click run and type Regedit.
7. Then Delete Registy Folder:- hkcu/software/Teamviewer.
Still you have uninstalled the Teamviewer from system successfully and it is time to re-install the Teamviewer into system.
Steps:-
1. Go To Control Panel>Network And Internet>Network And Sharing Center.
2. Then Go to the Change Adapter Settings.
3. Disable LAN or Local Area Network And Wireless Network Connection on your system.
You need to install the Teamviewer again while disconnecting the internet.
4. Now Install Teamviewer Again.
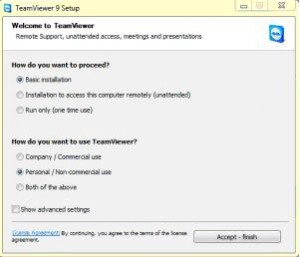
5. Select Basic Installation and Personal/Non-Commercial Use.
6. Click on Accept-Finish.
7. When The installation finishes then Open Teamviewer.
8. When Teamviewer opened You will see:- Free License(Non-Commercial Use Only)
9. Now connect your computer to Local Area Connection and Wireless Network Connection.
10. When Internet will be Connected you will see: – Ready To Connect
With above mentioned steps of uninstallation and installation, you become successful to remove the error that you found while starting Teamviewer.


